Retaining Wall Steps for Better Access Between Garden Levels
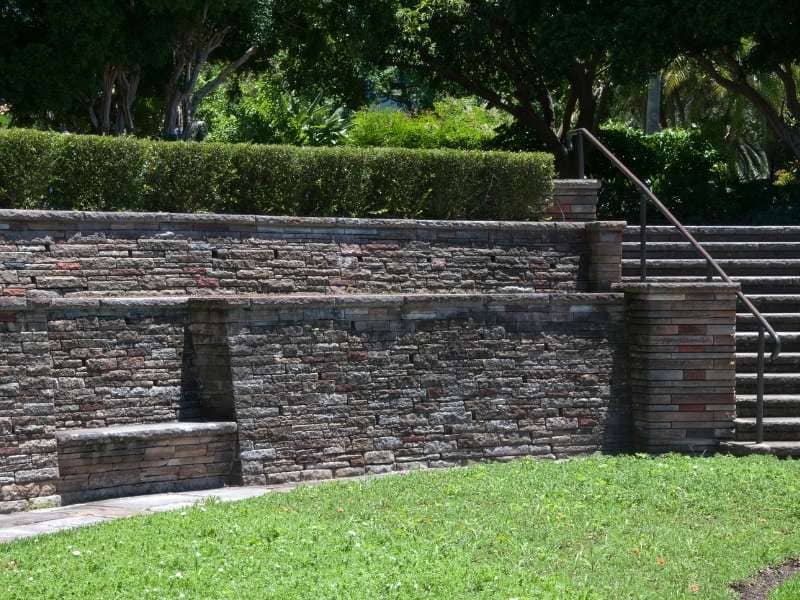
Retaining wall steps built into a tiered garden with natural stone treads, brick masonry walls, level landings, and landscaped planting beds in Birmingham.

A tiered garden looks great from the patio, but it can be a pain to actually use. Without good steps, people cut across planting beds, slip on wet slopes, or skip the upper level entirely. Steps built into a retaining wall fix that by turning each terrace into usable space you can reach safely.

The key is treating the steps and the wall as one structure. They share the same soil, the same water, and the same base, so they have to be planned together. This guide covers where to place steps, which materials work, how to size them, how to handle drainage, and how to finish the edges so they last.

Planning Step Locations Along a Tiered Garden

Put steps where people already want to walk. Watch the worn paths in the grass and the routes between the back door, patio, garden beds, and any outdoor kitchen or seating area. A step placed off that natural line usually gets ignored while a muddy shortcut forms beside it.

Steps can sit in a few spots along a retaining wall. They can cut straight through the wall, sit at one end where the wall steps down, or run alongside the wall as a separate flight. Cutting through the middle looks strong but means the wall has to turn and return on both sides of the opening, which adds work.

Before anything is built, check a few things on site:

  • Where the wall’s highest and lowest points fall
  • Whether the steps will land on level ground at top and bottom
  • How the steps connect to an existing brick patio, stone patio, or walkway
  • Where utilities, irrigation lines, and tree roots sit

Leave a flat landing at the top and bottom of each flight. A landing gives people a safe place to stop and turn. It also makes the connection to paths and patios look intentional instead of squeezed in.

Choosing Retaining Wall Materials for Integrated Garden Steps

The best material is usually the one that matches the wall and the rest of the yard. Steps that look different from the wall they pass through can feel tacked on. Most homeowners choose between brick masonry, natural stone, and segmental concrete block.

Brick suits homes with brick exteriors and pairs well with brick pavers on paths and patios. It gives crisp, even lines and a classic look. Brick steps usually sit on a poured concrete base, and the mortar joints need care over time.

Natural stone masonry fits informal gardens and sloped lots. Large stone slabs make solid treads with very few joints, while stacked or mortared stone builds the step faces and wall. Stone pavers can also serve as treads on a block or concrete base.

Segmental block systems often include matching step units and caps, which can simplify the build. Neither brick nor stone is always the better choice. The right pick depends on appearance, foot traffic, upkeep, budget, and the masonry already on your property.

Setting Step Dimensions for Comfortable Movement Between Levels

Outdoor steps should be shallower and deeper than indoor stairs. People walk them in garden shoes, carry tools or plants, and often look around instead of down. Many outdoor designs use risers around 5 to 7 inches tall and treads of 12 to 16 inches deep or more.

A common rule of thumb is that two risers plus one tread should equal roughly 26 to 27 inches. That ratio tends to match a natural walking stride. Keep every riser in a flight the same height, because even a half-inch difference can cause trips.

Width matters as much as height. A single person can use a narrow flight, but 4 to 5 feet feels more comfortable and lets two people pass or walk side by side. Wider steps also look better in proportion to a long retaining wall.

Long slopes may need several short flights with landings between them. Handrail and lighting needs can depend on step count, height, and local code. Confirm those details with your contractor or building department before you settle on a design.

Managing Drainage Where Garden Steps Meet Retaining Walls

Water is the biggest threat to retaining wall steps. Rain runs down the slope, collects behind the wall, and looks for the easiest way out, which is often right through the step opening. If it has nowhere to go, it washes out the base and pushes on the wall.

Good drainage starts behind the wall. Most retaining walls need free-draining gravel behind them and, in many cases, a perforated drain pipe at the base to carry water away. Mortared walls may also need weep holes, which are small openings that let trapped water escape.

The steps themselves need a slight forward pitch so water sheds off each tread instead of pooling. Grade the soil at the top of the flight so runoff moves away from the steps. If the yard sees heavy runoff, a swale or drain at the top can redirect water before it reaches the wall.

Taller walls, heavy clay, and steep slopes can change what the wall needs. Some retaining walls require engineering or permits depending on height, load, and local rules. Ask about this early, since drainage and base work are hard to fix after the stone is set.

Finishing Step Edges and Transitions for Long-Term Durability

The edges and joints decide how long steps look good. Treads should overhang the riser slightly, often about an inch, to cast a shadow line that makes each step easier to see. A rounded or eased edge also chips less than a sharp one.

Pay attention to where steps meet the wall. The wall should wrap or return cleanly along the sides of the flight so soil can’t spill onto the treads. Caps on the wall ends give a finished look and protect the top course from water.

Transitions at the top and bottom need the same care. Where steps meet a patio, path, or lawn, keep the surfaces level and supported on a compacted base. Edge restraints hold brick pavers and stone pavers in place so they don’t creep away from the steps.

Plan for simple upkeep. Sweep debris, pull weeds from joints, and repoint loose mortar before water gets in. Catching a shifting tread or cracked joint early costs far less than rebuilding a flight later.

Frequently Asked Questions

Can steps be added to an existing retaining wall?

Steps can often be added, but it depends on how the wall was built and its condition. Cutting into a wall can weaken it if the sides of the opening aren’t rebuilt properly. Some walls are better served by a flight that runs beside them instead. A mason should inspect the wall before any cutting starts.

What is the best material for retaining wall steps?

No single material is best for every yard. Brick works well with brick homes and patios, while natural stone suits informal gardens. Block systems offer matching step units that simplify the build. Your choice should reflect appearance, traffic, maintenance, and budget.

How deep should outdoor garden steps be?

Many outdoor steps use treads around 12 to 16 inches deep. Deeper treads paired with shorter risers make for an easy, relaxed stride. The exact size depends on the slope and available space. Keep every step in a flight consistent to reduce trips.

Why do retaining wall steps settle or shift?

Most settling comes from water and a weak base. Poor drainage can wash out soil under the treads or push on the wall behind them. Loose fill that wasn’t compacted will also sink over time. A solid base and planned drainage prevent most of these problems.

Do retaining wall steps need much maintenance?

They need less care than many outdoor features, but they aren’t maintenance-free. Clear leaves and debris so water drains freely. Watch for loose treads, cracked mortar, and blocked weep holes. Small repairs made early keep the steps safe and the wall stable.
Stone Patio Design Features That Improve Outdoor Living

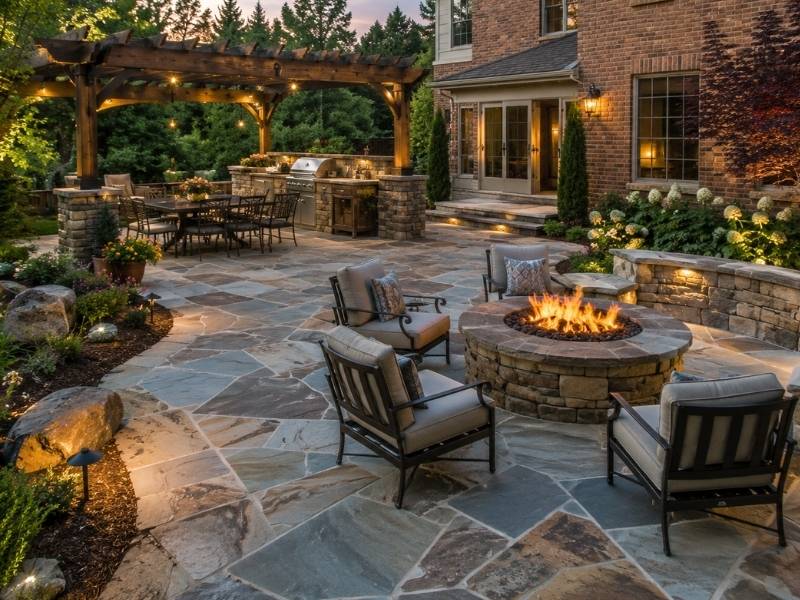
Natural stone patio with a fire pit, pergola, outdoor kitchen, and seating area designed to improve outdoor living behind a brick home.

A stone patio can change how you use your backyard. It adds space for grilling, sitting, and relaxing outside. In Birmingham, Alabama, homeowners want patios that handle hot summers, heavy rain, and red clay soil. The right design makes that happen. This guide walks through five things that matter most when planning a stone patio that lasts.

Choosing the Right Location for a Stone Patio

Location decides almost everything else about your patio. Pick the wrong spot and you’ll fight drainage, shade, and access problems for years.

Start by watching your yard for a few days. Notice where water pools after rain. Notice where the sun hits hardest in July. Birmingham summers run hot, so afternoon shade matters.

Things to check before you choose a spot:

  • Distance from the house (closer means easier utility and furniture access)
  • Slope of the land (gentle slopes drain better than flat ground)
  • Existing trees (roots can crack stone over time)
  • Privacy from neighbors
  • Sun exposure during peak use hours

A patio near the back door works well for daily use. A patio tucked further into the yard feels more like a retreat. Both can work. It depends on how you plan to use the space.

Designing a Stone Patio for Comfort and Function

A patio needs more than good looks. It needs room to move, sit, and gather without feeling cramped.

Size the Space for Real Use

Most small patios fail because they’re too tight for furniture and walking room. A table for four needs roughly 10 feet by 10 feet of open space. Add a grill or fire pit and you’ll want closer to 12 by 14 feet.

Plan Traffic Flow

Leave at least 3 feet of clear walking space around furniture. This keeps the patio from feeling like an obstacle course. Think about how people will move from the door to the seating area, and from the seating area to the yard.

Match the Shape to the Yard

Square and rectangular patios are simple to build and furnish. Curved patios soften a yard but cost more in labor since stone has to be cut to fit the edges.

Selecting Stone Materials That Complement Your Home

Stone choice affects cost, durability, and how well the patio matches your house.

Common options used in Birmingham area homes:

  • Flagstone – Irregular shapes, natural look, and a popular choice for homeowners considering flagstone patio installation for casual outdoor spaces.
  • Fieldstone – Rugged texture, works well with rustic or farmhouse homes
  • Travertine – Smooth surface, stays cooler underfoot in summer heat
  • Limestone – Light color, pairs well with brick exteriors common in the South

Match the stone tone to your siding or brick. A warm-toned stone next to red brick creates a connected look. A cool gray stone can clash with warm brick if you’re not careful.

Texture matters too. Smoother stones look more formal. Rougher stones fit casual backyard spaces better and hide dirt longer between cleanings.

Why Proper Drainage Improves Stone Patio Performance

Drainage is the part homeowners skip and regret later. Without it, water sits under the stone, freezes in winter, and pushes the patio out of level.

A patio should slope away from the house at about a quarter inch per foot. This small grade moves water off the surface instead of letting it pool.

Base Layer Matters

A compacted gravel base under the stone allows water to drain through instead of collecting underneath. Skipping this step is the top reason patios sink or shift within a few years.

Joint Material Affects Drainage Too

Sand-filled joints let some water pass through. Polymeric sand locks joints in place while still allowing drainage, which helps stop weeds and ants from moving in.

Alabama clay soil holds water longer than sandy soil. That makes proper grading and a solid gravel base even more important here than in drier regions.

Adding Features That Enhance Outdoor Living Spaces

Once the base patio is solid, added features turn it into a true outdoor room.

Popular additions include:

  • Built-in seating walls (saves space, doubles as a planter edge)
  • Outdoor kitchens (grills, counters, and storage built into the stone layout)
  • Fire features (a stone fire pit or fireplace extends use into cooler months)
  • Lighting (path lights or recessed step lights improve safety after dark)
  • Pergolas or shade structures (cuts direct sun during peak afternoon heat)

These additions don’t need to happen all at once. Many homeowners build the patio first, then add a fire pit or kitchen in a later phase. Planning the layout early makes it easier to add these features without redoing the whole patio.

Frequently Asked Questions

How long does a stone patio last?

A properly built stone patio with good drainage can last 25 years or more. Poor base preparation can significantly shorten its lifespan, often leading to major repairs within 5 to 10 years.

What is the best stone for a patio in Birmingham, Alabama?

Limestone and flagstone are both excellent choices for Alabama’s climate. They handle heat and humidity well, and their lighter colors help reflect sunlight instead of absorbing it.

Does a stone patio increase home value?

Yes. Outdoor living spaces, including stone patios, are often viewed as desirable features that can improve curb appeal and increase resale value, especially in areas where outdoor entertaining is common.

How thick should the gravel base be under a stone patio?

Most stone patios require a compacted gravel base that is 4 to 6 inches thick. Areas with heavy foot traffic or clay-rich soil may require a deeper base for long-term stability.

Can a stone patio be built on a slope?

Yes. A slight slope helps direct water away from the patio, but steeper slopes may require retaining walls or additional grading to prevent erosion and movement over time.

What Is Stone Masonry? A Simple Guide for Homeowners

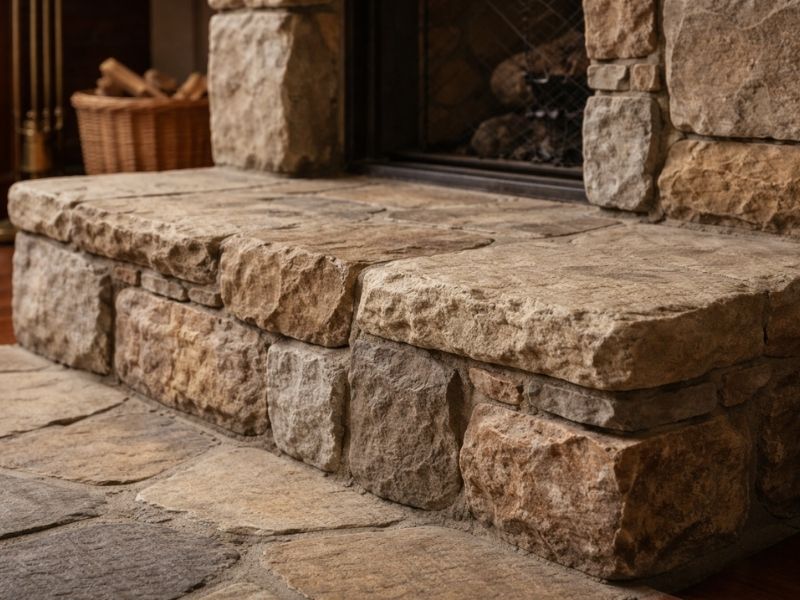
Natural stone masonry fireplace with stacked stone construction and detailed stonework used in residential interior design

Stone masonry is one of the oldest building methods around. It’s also one of the most misunderstood. Most homeowners know stone looks great, but have no idea what goes into building it or what to watch for when something goes wrong. This guide covers the basics so you’re not walking into a project blind. 

What Stone Masonry Actually Means

Stone masonry is the process of placing and securing natural or manufactured stone to build walls, steps, foundations and other structures. The stones are held together with mortar or, in some older methods, dry-stacked without any mortar at all.

Two broad categories cover most of what you’ll see.

Rubble Masonry

Rubble masonry uses rough, uncut stones. They’re laid with mortar and fitted together without much shaping. It looks rugged and natural. Older garden walls and field fences often use this method. It’s lower cost but less precise.

Ashlar Masonry

Ashlar masonry uses stones that are cut and dressed to uniform sizes. The joints are tight and clean. It looks sharp and is more common in formal construction, feature walls and high-end residential builds. It takes more time and skill to do right.

Knowing which type you’re looking at helps when you need repairs. Matching rubble is different from matching ashlar, and the wrong mason for the job shows fast.

The Materials Involved

Not all stone performs the same way outdoors or in wet conditions.

Common Stone Types

  • Granite is dense and very hard. It handles weather well and resists staining. Good for high-traffic areas and exterior walls.
  • Limestone is softer and easier to cut. It looks great but absorbs more water than granite. Needs sealing in wet climates.
  • Sandstone is porous. It’s attractive but needs careful maintenance. Prone to spalling in freeze-thaw conditions.
  • Slate splits into flat layers naturally. Common for flooring, cladding and roofing. Durable when installed correctly.
  • Fieldstone is whatever stone is pulled from local land. It varies a lot in hardness and durability depending on where it comes from.

Picking the wrong stone for the climate or the application is a mistake that shows up years later. A mason who knows local conditions is worth asking before you commit to a material.

How Stone Masonry Gets Built

The process depends on the type of structure, but the core steps follow a similar path.

A solid footing goes in first. Stone is heavy, much heavier than brick, so the base has to carry the load without settling. Then the mason lays the first course, fitting stones together so weight distributes evenly. Each course above that overlaps the joints below, just like brick, so the wall ties itself together as it rises.

Mortar fills the gaps and locks everything in place. For dry-stack work, the fit of each stone does that job instead. Dry-stack walls take longer to build well because every stone has to sit right without any help from mortar.

Coping stones go on top of freestanding walls to shed water. Without them, water sits on the top course, works into the joints and causes damage over time.

Problems to Watch for in Stone Masonry

Stone feels indestructible. It’s not.

Failing Mortar Joints

Mortar between stones breaks down over time. Crumbling joints, gaps or soft spots let water in. Left alone, water freezes in winter, expands and pushes the stones apart. Repointing the joints early is a small job. Waiting turns it into a big one.

Efflorescence

White mineral deposits on the stone face mean water is moving through the wall. The stone itself may be fine, but the moisture source needs finding and fixing. Wiping off the white streaks without fixing the water problem means they’ll be back.

Spalling and Surface Damage

Porous stones like sandstone and limestone can spall when water gets in and freezes. The face chips or flakes off. Once it’s gone, it’s gone. Matching replacement stones is harder than most people expect, especially on older builds.

Settlement Cracks

A crack running through multiple stones and joints usually means the footing has shifted. Small cracks from normal settling aren’t always serious. A crack that’s growing or widening is. Get a mason to look at it before it gets worse.

Maintaining Stone Masonry Without Overdoing It

Stone needs less maintenance than most materials, but it does need some.

Check mortar joints every few years. Soft or crumbling spots need repointing before water gets a foothold. Keep soil and plant growth away from the base of stone walls. Roots work into joints over time and slowly pull them apart.

Seal porous stones in wet climates. Limestone and sandstone benefit from a breathable sealer that keeps water out but lets the stone dry from the inside. Avoid film-forming sealers that trap moisture behind them.

Don’t pressure wash stone masonry. High pressure strips mortar from joints and can pit softer stones. A low-pressure rinse and a stiff brush handle most cleaning jobs without causing damage.

Quick Maintenance Checklist

  • Inspect mortar joints every two to three years
  • Repoint any soft or crumbling spots before winter
  • Keep mulch and soil away from the base of stone walls
  • Seal porous stone every three to five years
  • Avoid pressure washing

Frequently Asked Questions

How long does stone masonry last? 

Stone itself can last centuries. The mortar joints are the weak point and typically need attention every 25 to 50 years depending on weather exposure and the original mortar mix used. Dry-stack walls last as long as the stones hold their position, which with a good base can be a very long time.

Is stone masonry more expensive than brick? 

Yes, usually. Stone costs more as a material and takes longer to lay because each piece is irregular. Ashlar masonry with cut stone is the most expensive. Rubble masonry with local fieldstone can be more affordable, but labor still runs higher than brick in most cases.

Can stone masonry be repaired without replacing the whole wall? 

Most of the time, yes. Failed mortar gets repointed. Damaged stones get replaced individually if a match can be found. Full wall replacement is rare and usually only happens after serious structural failure or years of ignored water damage.

What’s the best stone for an exterior wall in a wet climate? 

Granite is the strongest choice for wet conditions. It’s dense, absorbs very little water and holds up in freeze-thaw cycles. Limestone and sandstone can work but need sealing and more regular maintenance in high-moisture areas.

Do I need a permit for stone masonry work? 

It depends on the scope. Repointing and minor repairs usually don’t need a permit. New walls, structural work or anything attached to the home typically does. Check with your local building department before starting any significant project.