How Stone Masonry Improves Durability Without Sacrificing Curb Appeal

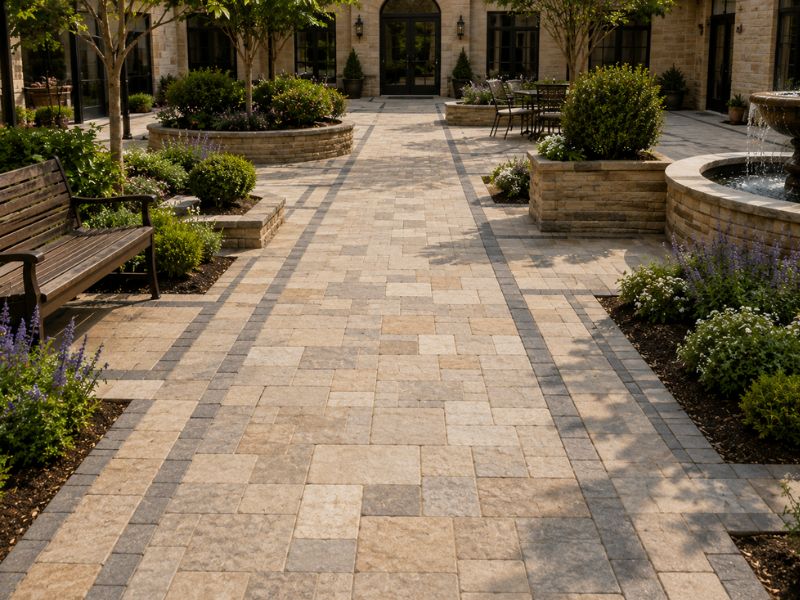
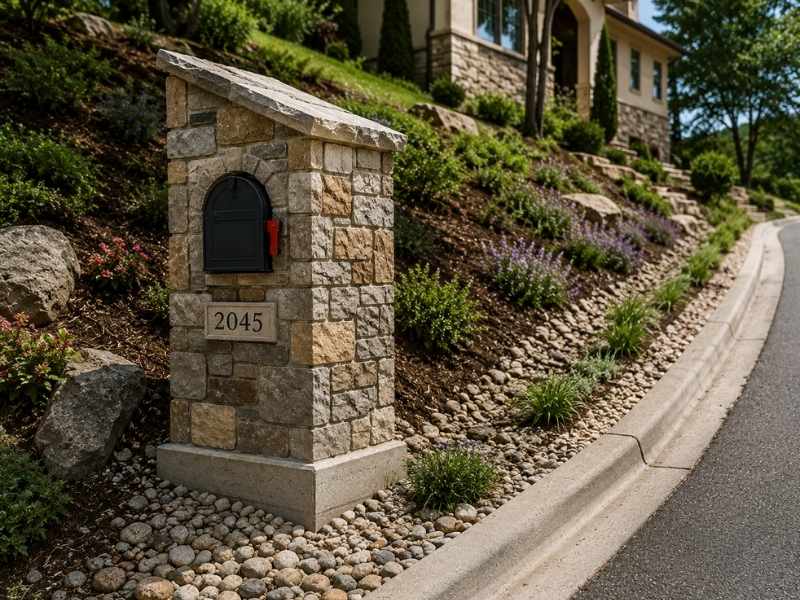
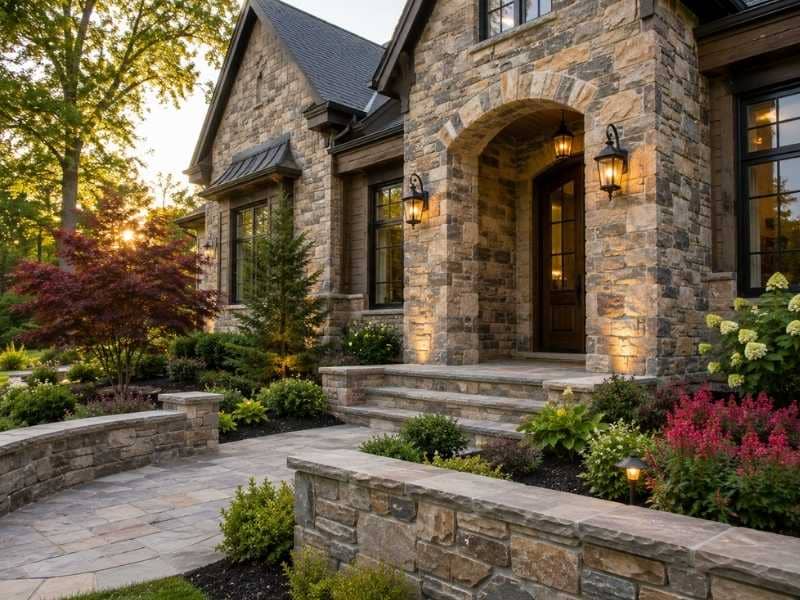
Stone masonry improving durability and curb appeal on a residential exterior with natural stone walls and a professionally finished entryway.

Stone masonry gives a home both strength and natural beauty at the same time. Its tough surface stands up to weather, while its look adds warmth that many owners love. That mix makes it a strong choice for facades, walls, entryways, stone hearths, fireplaces, and outdoor living spaces.

Few building choices manage to be this practical and this attractive. Stone holds its shape and its charm across many seasons of use. The right design lets a home enjoy lasting protection without giving up its good looks.

Stone Masonry Stands Up to Weather and Daily Wear

Well-built stone masonry handles the rough side of the outdoors with ease. Rain, heat, wind and the odd hard knock all wear on an exterior over time. Quality stone and sound mortar joints help these features keep their strength through it all.

This toughness is a big part of the appeal. A wall or facade built the right way resists the slow damage that weather brings. That staying power means fewer repairs and a look that holds up year after year.

Material Choices That Balance Strength and Appearance

The type of stone shapes both the look and the lifespan of a project. Natural and manufactured stone differ in color, texture, shape, density and how well they shrug off weather. Each option brings its own blend of beauty and toughness.

The best choice fits both the design and the setting. A stone that suits a dry, mild spot may struggle in heavy rain or strong sun. Picking the material with the local weather in mind helps the finished work last as long as it looks good.

Proper Installation Makes Stone Masonry Last Longer

Even the best stone falls short without skilled installation. A stable base, correct mortar work, good drainage and secure placement all play a part. Well-finished joints round out a job that can stand the test of time.

Careful work at this stage prevents trouble down the road. Poor drainage or loose placement can lead to movement, moisture and loose stones. A skilled crew heads off these issues, so the masonry stays strong for decades.

Maintaining Stone Masonry Without Losing Its Natural Character

A little upkeep keeps stone looking its best without changing its charm. Simple habits protect both the surface and the joints over the years.

Helpful maintenance steps include:

  • Checking the stone and mortar during routine inspections
  • Cleaning gently rather than with harsh scrubbing
  • Keeping vines and heavy plants off the surface
  • Repairing open mortar joints before they widen

A few cautions matter as much as the steps above. Strong chemicals, aggressive pressure washing and the wrong repair materials can all harm the stone. Gentle care preserves the natural character that makes stonework special.

Long-Term Value of Stone Masonry for Residential Exteriors

Durable stone features pay off over many years of ownership. They cut down on the frequent repairs that lesser materials often need. At the same time, they add character and curb appeal that buyers notice.

This blend of function and beauty gives stone its lasting worth. A well-designed, well-kept feature can stay both attractive and useful for generations. That kind of return is rare among exterior choices.

Frequently Asked Questions

How Long Does Stone Masonry Typically Last?

Well-built stone masonry can last for decades and often serves for generations. Its lifespan rests on the stone type, the quality of the install and the drainage. Local climate and steady upkeep also play a part.

Does Stone Masonry Require a Lot of Maintenance?

Not much, though it should still get a regular check. Look for open mortar joints, loose stones, staining and signs of moisture. Handling small issues early keeps them from growing into major repairs.

Can Damaged Stone Masonry Be Repaired?

Yes. Many problems respond to repointing joints, resetting loose stones or swapping out damaged pieces. Fixing the source of any moisture is part of a lasting repair. The right method depends on the cause and the extent of the damage.

Is Stone Masonry a Good Choice for Hot, Humid Climates?

Yes. Stone masonry performs well in hot, humid areas when it uses proper drainage and materials suited to the weather. Heat, humidity, heavy rain and shifting conditions all test a wall over time. Skilled installation is key to strong long-term results.

How Brick Veneer Differs From Solid Brick Construction

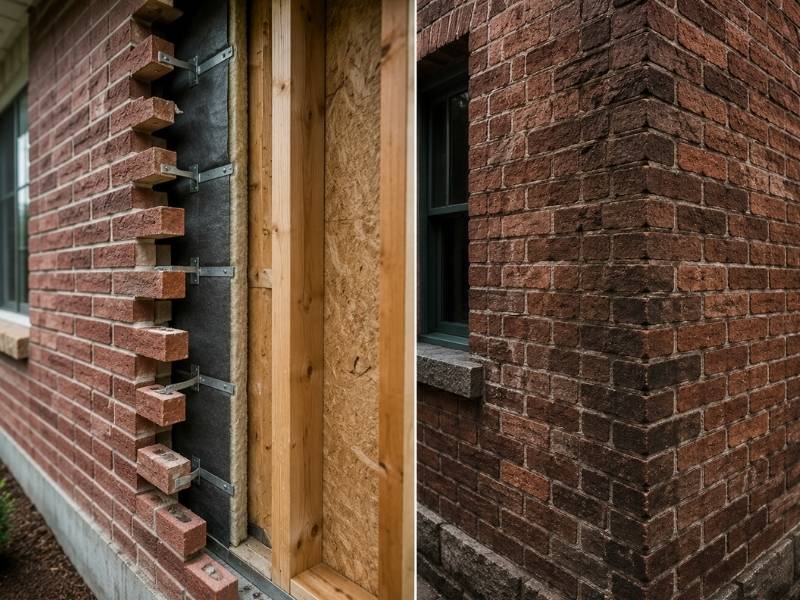
Side-by-side comparison of brick veneer and solid brick construction on residential homes, illustrating the structural differences for homeowners in Birmingham, AL.

Two houses can look identical from the street. Same brick, same color, same pattern. But one is built with brick veneer. The other uses solid brick construction. The difference matters a lot more than curb appeal. Knowing which type you have changes everything from repair costs to how a wall handles moisture. Here’s what actually separates the two, and why it matters for homeowners in Birmingham.

The Facade That Isn’t Holding Anything Up

Brick veneer is a single layer of brick. It gets attached to the outside of a home’s real structure. That structure is usually wood framing or block. The brick sits in front of it purely as a facade.

The brick isn’t holding the house up. A wood frame, steel frame, or concrete block wall behind it does that job. The brick layer connects to this structure using metal ties. A small air gap sits between the brick and the wall behind it.

This gap matters more than it looks. It lets moisture drain and air circulate. That keeps water from sitting against the structural wall behind the brick.

When the Brick Itself Is the Wall

Solid brick construction works differently. It’s a basic, structural difference. Instead of one layer of brick sitting in front of a separate structure, solid brick construction uses multiple layers of brick. This traditional method of brick wall construction allows the masonry itself to support the building without relying on a wood-framed wall behind it.

There’s no wood frame hiding behind the brick in true solid construction. The brick itself is the wall. This method was common in older homes. Homes built before the mid-1900s often used it, before brick veneer construction became the standard practice it is today.

Why the Difference Shows Up During Repairs, Not Curb Appeal

From the sidewalk, brick veneer and solid brick construction can look exactly the same. But once you get into repairs, moisture issues, or renovations, the differences show up fast.

Managing Water Two Different Ways

Brick veneer relies on that air gap and drainage system to manage water. Weep holes at the base let moisture escape instead of building up behind the brick. Solid brick construction handles moisture differently. It often relies on the sheer mass and density of multiple brick layers to resist water penetration. This works differently, and sometimes less effectively over time, compared to a properly built veneer system.

What a Crack Actually Means Depends on the Wall Behind It

A cracked brick in a veneer wall is usually a cosmetic and moisture concern. It’s not a structural one, since the real structural wall sits behind it. A cracked or shifting wall in true solid brick construction is a bigger deal. That brick is doing actual structural work holding the building up.

Why One Type Costs Less to Fix

Veneer brick isn’t structural, so repairs tend to be more straightforward. A mason can often replace individual bricks or repoint mortar joints. This work usually doesn’t risk the building’s structural integrity. Solid brick construction repairs require more caution. Work on the brick itself can affect the wall’s ability to bear weight.

Figuring Out Which One Your Home Actually Has

For homeowners unsure which type of construction their home uses, a few signs can help.

Look Closely at Window and Door Trim

Look closely at a window or door frame where brick meets the opening. Veneer construction often shows a visible gap or flashing detail. Solid brick construction typically doesn’t have this same detail.

Let the Home’s Age Guide Your Guess

Homes built before the 1950s are more likely to use solid brick construction. This holds true in many parts of the country, including older Birmingham neighborhoods. Homes built afterward are far more likely to use brick veneer. It became the standard residential building method as construction costs and techniques shifted.

Peek Behind the Brick From an Unfinished Space

If you have access to a basement, attic, or unfinished area, check where the wall structure is visible. You can often see whether wood framing sits behind the brick. Visible studs or framing material behind the brick usually confirm veneer construction.

What This Means for New Construction or a Major Renovation

For anyone planning new construction or a major renovation involving brick, this distinction shapes some real decisions.

  • Brick veneer offers more design flexibility. It’s not doing structural work, so it can be applied to various framed structures.
  • Solid brick construction offers a different kind of durability. It comes with less flexibility for later renovations that might involve altering wall openings or structure.
  • Repair and maintenance costs generally run lower over time with veneer construction. Work on the brick itself doesn’t carry the same structural risk.
  • Older solid brick homes sometimes need specialized masons familiar with historic construction methods. Repair techniques differ from standard veneer repair work.

Bringing In the Right Mason for the Job

Not every masonry contractor has equal experience with both construction types. This matters more than most homeowners expect.

A mason who mainly works on modern veneer repairs may not have the training needed to safely assess a solid brick structural wall. Solid brick construction, especially in a historic home, sometimes requires knowledge of lime-based mortar and older building techniques. These differ quite a bit from modern practices.

Before hiring anyone for brick work, ask directly about their experience with your specific construction type. A mason confident working on one type isn’t automatically qualified for the other. Getting this wrong can turn a simple repair into a bigger structural problem.

Frequently Asked Questions

Is brick veneer less durable than solid brick construction?

Not necessarily. When properly installed and maintained, brick veneer can provide long-lasting performance comparable to solid brick construction. The primary difference is that solid brick walls provide structural support, while brick veneer is attached to a framed wall system.

Can you tell the difference between brick veneer and solid brick from the outside?

Not always. From the exterior, both construction types often appear similar. The differences are usually easier to identify around window and door openings or from unfinished interior areas where the wall structure is visible.

Is it more expensive to repair solid brick construction than brick veneer?

In many cases, yes. Because solid brick walls are structural, repairs often require more specialized techniques and careful planning. Brick veneer repairs are typically less complex, depending on the extent of the damage.

Do older homes commonly have solid brick construction?

Many homes built before the mid-20th century were constructed with solid brick walls, although this varies by neighborhood, architectural style, and the age of the home. A professional mason can determine the type of construction used in a specific property.

Does brick veneer require the same maintenance as solid brick construction?

Both systems benefit from routine inspections and maintenance of mortar joints. Brick veneer also relies on proper drainage components, such as air spaces and weep holes, so keeping these features clear is important for preventing moisture-related problems.

Retaining Wall Problems Homeowners Should Watch For Early

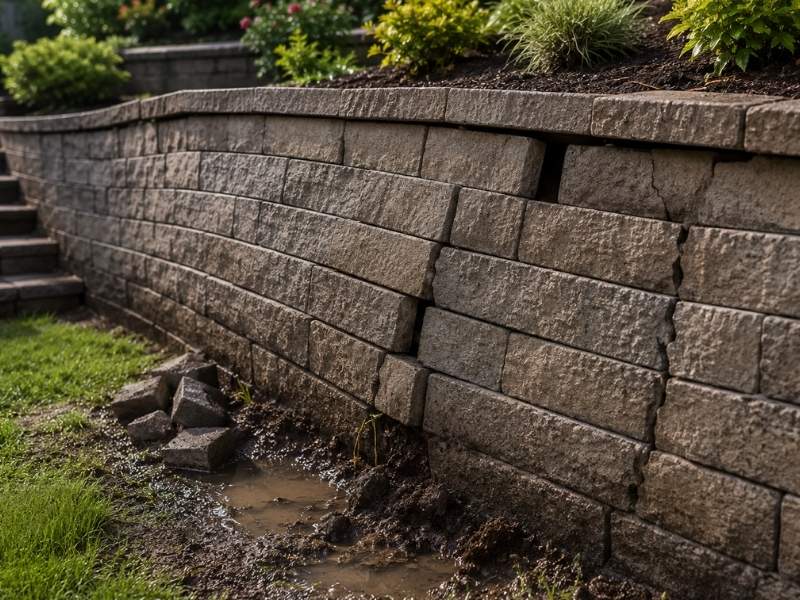
Cracked and leaning retaining wall with soil erosion and standing water, showing early signs of structural problems in Birmingham, AL.

A retaining wall holds back a lot more than dirt. It holds back water, pressure, and the slope of your entire yard. When something goes wrong, the signs show up small at first. A hairline crack. A slight lean. By the time most homeowners notice, the problem has already been building for months. Catching these early signs saves you from a full wall rebuild later, and it starts with knowing exactly what to look for.

Why Retaining Walls Fail in the First Place

Most retaining wall problems trace back to one thing: water. Many retaining wall repair projects begin because poor drainage allows pressure to build behind the wall over time.

A wall’s main job is holding back soil. But soil holds water, and water adds weight. Without a way to drain, that weight pushes against the wall constantly. Over time, even a well-built wall starts to give.

Poor drainage is the most common cause. But soil type, wall age, and original construction quality all play a role too. Clay-heavy soil, common across parts of Birmingham, expands and contracts more than sandy soil. That movement stresses a wall in ways a homeowner never sees happening underground.

Early Signs a Retaining Wall Is in Trouble

Most retaining wall failures don’t happen overnight. They build slowly, and the early signs are easy to miss if you’re not looking for them.

Cracks That Weren’t There Before

A few hairline cracks in mortar joints are normal over time. But cracks that widen, run diagonally, or appear in a pattern across multiple courses of brick or stone are a different story. These often point to shifting pressure behind the wall, not simple age.

A Wall That’s Starting to Lean or Bulge

Run your eye along the top of the wall. Does it look straight? A wall that bulges outward in the middle, or leans forward at the top, is showing you where pressure has already won against the structure. This is one of the clearest signs that something behind the wall isn’t draining the way it should.

Water Pooling at the Base

Standing water right at the base of a retaining wall after rain is a warning sign. It means water isn’t draining through or around the wall properly. Instead, it’s sitting there, adding pressure and slowly weakening the soil and the wall’s foundation.

Soil Settling or Sinking Behind the Wall

Look at the ground just behind the wall. If it’s sinking, settling, or pulling away from the wall itself, water may be washing out fine soil particles from behind the structure. This creates hidden gaps that reduce the wall’s support over time.

Missing or Crumbling Mortar

Mortar joints that are crumbling, missing chunks, or feel soft when you press on them have lost their strength. This lets water infiltrate more easily, and it also means the wall has less structural integrity holding its individual stones or bricks together.

Why Drainage Is the Real Root of Most Problems

Almost every retaining wall issue traces back to how water moves, or fails to move, around the structure.

Weep Holes and What They’re Actually For

Small gaps built into a retaining wall, often called weep holes, exist for one reason. They let built-up water escape instead of pooling behind the wall. If these get blocked by dirt, debris, or plant growth, water has nowhere to go, and pressure builds fast.

Grading That Sends Water Toward the Wall Instead of Away

Sometimes the problem isn’t the wall itself. It’s the ground around it. If the yard grade slopes toward the wall instead of away from it, every rainstorm sends more water directly into the soil the wall is trying to hold back.

When a Small Repair Isn’t Enough Anymore

Some retaining wall problems are simple fixes. Others mean the wall has failed structurally and needs to come down.

Signs You’re Past the Point of Patching

A wall that’s leaning more than a couple inches out of plumb, or one with cracks running through multiple sections, usually can’t be patched back to safety. At that point, a mason needs to assess whether the wall can be reinforced or needs to be rebuilt from the footing up.

Why Waiting Makes the Fix More Expensive

A small drainage fix or repointing job today costs far less than a full wall replacement later. Once a wall fails structurally, everything behind it, patio, landscaping, sometimes even a portion of the yard itself, is at risk of shifting or collapsing along with it.

What to Do If You Spot These Signs

  1. Take photos of cracks, leaning, or pooling water so you can track whether the problem is getting worse over time.
  2. Clear any visible debris blocking weep holes, since this is sometimes an easy fix that reduces pressure fast.
  3. Check the grading near the wall to see if water is being directed toward it instead of away.
  4. Call a mason for an inspection if you notice leaning, bulging, or cracks that seem to be spreading.
  5. Don’t ignore small changes. A wall that looks fine one season can shift significantly by the next, especially after a wet winter.

Frequently Asked Questions

How can I tell if a retaining wall crack is serious?

Hairline cracks are often cosmetic, but cracks that widen over time, run diagonally, or extend across multiple rows of brick or stone may indicate structural movement. If the crack changes in size or new cracks appear, it’s a good idea to have the wall evaluated by a masonry professional.

Can a leaning retaining wall be repaired without rebuilding it?

In some cases, yes. A retaining wall with only minor movement may be stabilized or reinforced if the underlying structure remains sound. However, walls with significant leaning, foundation failure, or extensive damage often require partial or complete reconstruction.

Why does water cause so many retaining wall problems?

Water trapped behind a retaining wall increases pressure against the structure. Without proper drainage, this pressure can lead to cracking, bowing, leaning, or even wall failure over time.

What are weep holes, and why are they important?

Weep holes are small openings built into certain retaining walls to allow trapped water to drain from behind the wall. They help reduce hydrostatic pressure, improve drainage, and extend the life of the retaining wall.

How often should a retaining wall be inspected?

A visual inspection once or twice a year is recommended, especially after periods of heavy rainfall or severe weather. Regular inspections can help identify small issues early, making repairs simpler and less expensive.

Why a Brick Mason Can Save You Money on Future Home Repairs

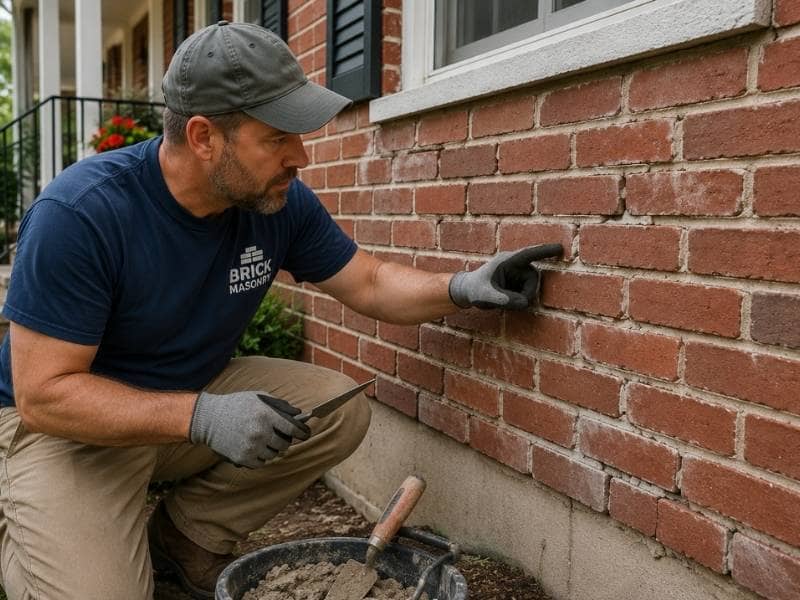
Brick mason inspecting cracked brickwork and deteriorating mortar joints to prevent water damage and costly future home repairs.

Most brick problems start small and cheap to fix. A thin crack shows up, or a mortar joint goes soft, or a single brick works loose. Left alone, those small issues let water in, and water is what turns a minor repair into an expensive one. A good brick mason earns their fee by catching that early, before the trouble spreads to walls, chimneys, steps and foundations. The savings come from timing more than from the repair itself.

Spot Small Brick Problems Before They Get Expensive

The signs of brick trouble aren’t hard to see. Knowing which ones matter is the hard part. A hairline crack might be nothing, or it might mean the wall is moving. That’s the difference a brick mason brings: they spot the crack, then read what caused it.

Each common sign tells a story. Soft or missing mortar means the seal between bricks has started to fail. A brick that shifts under light pressure has lost its grip. Water stains near the base of a wall point to moisture already getting in. A section that bulges or leans is the most serious, since it usually signals movement behind the brick. A homeowner paints over a crack, while a mason checks how deep it runs and what sits behind it.

Behind almost every costly brick repair is water. Damaged mortar, open joints and poor drainage all give it a way in, and once it moves behind the wall it can bring rot, mold and interior leaks. The full breakdown lives in how water damage spreads behind brick walls. A mason who stops water early saves you the repairs it causes.

Repair Mortar Before Full Brick Replacement Is Needed

The good news about brick is that the bricks usually outlast the mortar around them. Clay brick can last a century, while mortar joints tend to wear out every 25 to 30 years. So when mortar starts crumbling, the fix is often repointing rather than replacement. Repointing means raking out the failing mortar and replacing it, which reseals the wall and adds decades to brickwork with solid bricks.

Why Matching Mortar Matters

Matching mortar is trickier than it looks. The new mortar has to match the old in strength, color and joint shape, or the repair stands out and can even cause harm. Mortar that’s harder than the brick won’t flex with the wall, so the brick faces crack instead. A mason picks a mix that protects the brick and blends into the existing joints, since the wrong mortar can quietly crack the brick face.

Protect High-Wear Areas Around the Home

Some parts of a home take more abuse than the rest, and that’s often why they’re brick to begin with. Steps soak up rain and sun and take daily foot traffic. Walkways shift with the ground through freeze cycles. Chimneys sit high and exposed on every side, and porches and garden walls fight constant moisture. All of them wear faster than a sheltered wall.

A brick mason keeps these spots ahead of the damage. On steps and walkways, that means resetting loose units and refreshing joints before water works under them. On a chimney, it means checking the crown and the mortar up top, where failure lets water run straight down inside. On porches and walls, it means catching lean or bulge while a reset still works instead of a rebuild. Small, regular fixes save the most here, since damage in these spots spreads fast.

Avoid Costly DIY Masonry Mistakes

Plenty of brick repairs look simple enough to handle yourself, and some are. But a few common DIY moves cause more harm than the original problem, and they land on the repair bill later.

The first is using the wrong mortar. Pack a general-purpose mix into an old wall, and you can crack the very brick you meant to save. The second is sealing brick that’s already damp or damaged, which traps water inside, where it keeps working on the brick and speeds up flaking. The third, and most common, is patching a crack without asking what caused it. Fill a crack that’s still moving, and it comes right back, because the pressure behind it never left. A mason’s real value here is diagnosis: they fix the cause, so the repair holds.

Frequently Asked Questions

What does a brick mason notice that homeowners usually miss?

A mason reads the cause behind a problem, not only the problem itself. They can tell whether a crack runs through the brick or along the mortar, whether it’s still moving and what’s pushing on it. That read points to the real fix and keeps a small repair from growing.

Can a mason repair failing mortar without replacing the brick?

Usually, yes. If the bricks are still solid and only the mortar has worn out, repointing restores the wall without touching the brick. The mason rakes out the old joints and packs in fresh mortar, which seals the joints and adds years of life.

Is fixing brick early really cheaper than waiting?

Usually, yes. Early repairs deal with mortar and small cracks, which are quick and low cost. Waiting lets water get behind the wall, and that brings rot, loose brick and rebuilds that cost many times more.

Which brick repairs should you leave to a mason instead of DIY?

Anything tied to structure or water. Repointing, resetting loose steps, chimney work and leaning walls all need the right mortar and a read on the cause. A wrong fix on these often traps moisture or hides movement, which makes the next repair worse.

How often should someone have their brickwork checked?

A quick look once or twice a year catches most trouble early, and high-wear spots like chimneys and steps deserve a closer eye. Rather than waiting a set number of years, call a mason when joints start to look sandy or crumbly, the sign the seal is going.

Outdoor Fireplace Planning Tips for Backyards

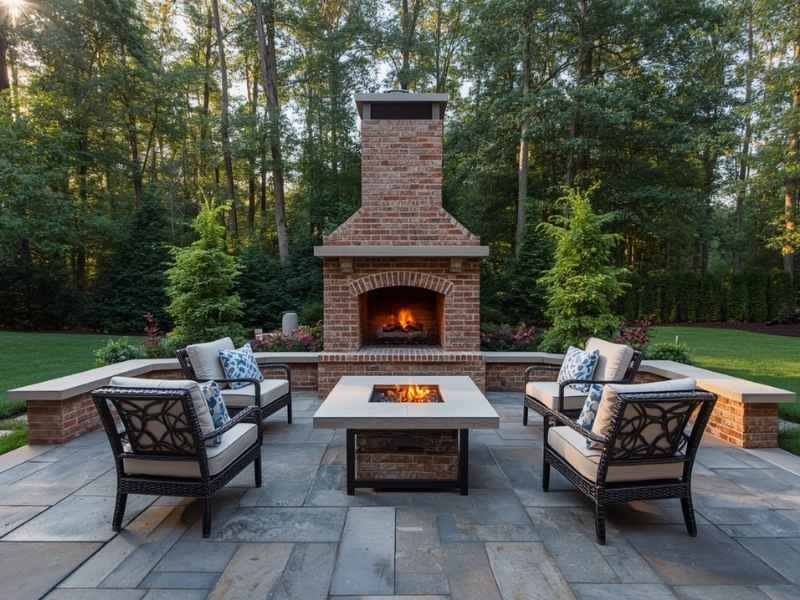
Brick outdoor fireplace with stone patio seating area in a landscaped Birmingham backyard, showing a finished outdoor living space with proper spacing and masonry design.

An outdoor fireplace can turn a plain backyard into the spot where everyone wants to hang out. But a lot of Birmingham homeowners jump straight to picking a design before working through the details that actually make an outdoor fireplace safe and functional.

Get the planning right first, and the design part becomes the easy half.

Before you pick a style, nail down placement, clearance rules, and drainage. These decisions affect safety and long-term durability far more than the look of the stone or brick.

Start With Placement, Not Design

Most homeowners start by picturing the finished fireplace. Start with location instead. Where the fireplace sits affects everything else, from safety to how much you’ll actually use it.

Good placement usually means:

  • Enough distance from the house, fence lines, and any overhanging trees
  • A spot sheltered from prevailing wind, so smoke doesn’t blow straight into your seating area
  • Easy access from the kitchen or main living space, since nobody wants to carry drinks and food across the whole yard
  • A flat, stable section of the yard, or one that can be leveled without major excavation

Pick the wrong spot and even a beautifully built fireplace becomes something nobody wants to use.

Clearance Rules You Cannot Skip

Birmingham follows building codes that set minimum clearance distances between an outdoor fireplace and nearby structures. These rules exist for a real reason. Heat and sparks travel farther than most people expect.

Before finalizing a location, confirm:

  • Minimum distance required from your house or any other structure
  • Clearance from fences, especially wood fencing
  • Distance from low-hanging tree branches
  • Any setback requirement from your property line

Skipping this step can mean a failed inspection or a forced rebuild after the fireplace is already finished. Check with your local permitting office before construction starts, not after.

Why Drainage Matters More Than Most People Expect

An outdoor fireplace sits exposed to Birmingham’s full range of weather, including heavy rain and humidity. Water that pools around the base can undermine the foundation over time, leading to cracking or shifting years down the road.

Plan for drainage by:

  • Grading the ground so water flows away from the fireplace base
  • Using a gravel or sand sub-base under the foundation to help water drain instead of collecting
  • Avoiding low spots in the yard where water naturally pools after storms

This step rarely shows up in design photos, but it’s one of the biggest factors in how long the structure actually lasts.

Choosing Between Wood-Burning and Gas

This decision affects both the construction and the ongoing maintenance of your outdoor fireplace.

Wood-burning fireplaces need:

  • A properly sized firebox and flue for good airflow
  • Storage space nearby for firewood
  • Regular cleaning to remove ash and creosote buildup

Gas fireplaces need:

  • A gas line run to the fireplace location, which affects where you can realistically place it
  • Less ongoing cleaning, but professional inspection of the gas components periodically
  • A slightly higher upfront cost in many cases, offset by lower long-term maintenance

Neither option is better across the board. It depends on how you plan to use the space and how much maintenance you’re willing to take on.

Matching the Fireplace to Your Yard’s Layout

An outdoor fireplace works best when it fits naturally into how your yard already flows.

Think through:

  • Whether the fireplace will anchor a seating area, or serve as more of a visual feature from a distance
  • How much seating you actually want around it, since this affects the overall footprint needed
  • Whether you’ll want it visible from indoors, which might change where on the property it makes sense to build

A fireplace planned around how the space gets used tends to get used a lot more than one placed just for looks.

Foundation Depth and Why It Matters in Alabama Clay

Alabama’s clay-heavy soil expands and contracts more than sandy or rocky ground, especially through wet and dry seasons. A shallow foundation might look fine at first, then start cracking or shifting within a few years.

A mason experienced with local soil conditions will typically:

  • Dig deeper than the minimum for a stable footing
  • Use a base material designed to handle some ground movement without transferring stress to the fireplace structure
  • Reinforce the foundation with rebar or similar material for added strength

This step costs more upfront than a shortcut foundation, but it’s the difference between a fireplace that lasts decades and one that needs early repair.

Questions to Ask Before Construction Begins

  • What is the required clearance distance from my house, fence, and property line?
  • How will you handle drainage around the fireplace base?
  • Do you recommend wood-burning or gas based on how I plan to use this space?
  • How deep will the foundation go, and how will it handle our clay soil?
  • Will this project need a permit, and who handles that paperwork?

Frequently Asked Questions

Do you need a permit to build an outdoor fireplace?

Many permanent outdoor fireplaces require a building permit, especially if they include a gas line or exceed certain size limits. Check with your local building department before construction begins.

How far should an outdoor fireplace be from a house?

The required distance depends on local building codes and the fireplace design. Many installations are placed between 10 and 25 feet from a home, but always verify the required clearance before building.

Should you choose a gas or wood-burning outdoor fireplace?

The best option depends on your needs. Gas fireplaces provide convenient operation and minimal cleanup, while wood-burning fireplaces offer a traditional fire experience but require more maintenance and fuel storage.

Why is a strong foundation important for an outdoor fireplace?

A stable foundation helps prevent settling and cracking over time. In areas with expanding and contracting clay soils, proper footing depth is essential for long-term structural performance.

Can poor drainage shorten the life of an outdoor fireplace?

Yes. Standing water around the foundation can weaken the supporting base and contribute to movement or cracking. Proper grading and drainage help protect the fireplace from long-term moisture damage.

Brick Mailbox Repair: Signs It Needs More Than a Quick Patch

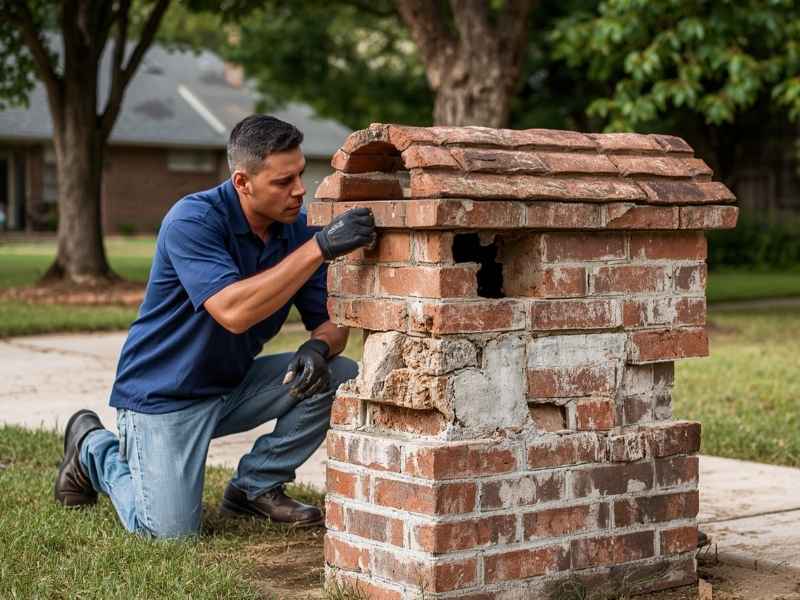
Brick mason inspecting a damaged brick mailbox with cracked mortar, missing bricks, and weathered masonry before repair in Birmingham, Alabama.

A brick mailbox takes a beating most homeowners never think about. Mail carriers bump it. Lawn mowers clip the base. Rain soaks the brick year after year. Brick mailbox repair often starts as a small fix, but some damage signals a bigger problem hiding underneath.

In Birmingham, where humidity and heavy rain are part of the yearly routine, catching these signs early saves you from a full rebuild later.

A few cracked bricks or loose mortar can often be patched. Leaning posts, widespread crumbling, or repeated cracking in the same spot usually mean the mailbox needs more than a surface fix.

Small Damage vs. Deeper Structural Trouble

Most brick mailbox issues start small. A chipped corner. A hairline crack. Loose mortar between a few bricks. These are usually easy fixes that a mason can patch in an afternoon.

The bigger question is whether that small damage is isolated or a symptom of something happening underneath. A single cracked brick from an accidental bump is not the same as cracking that keeps returning in the same spot every few months.

Signs a Quick Patch Will Actually Hold

Some damage really is simple. You can usually patch and move on if you see:

  • One or two cracked bricks with no cracking nearby
  • Small chips or scrapes from mower or vehicle contact
  • Minor mortar wear on the surface, without deep gaps
  • Cosmetic staining that hasn’t affected the brick’s strength

These issues rarely point to a deeper problem. A mason can replace the damaged bricks or repoint the mortar, and the mailbox holds up fine for years afterward.

Signs That Point to a Bigger Problem

Other damage patterns mean the patch job won’t last. Watch for these warning signs:

  • The mailbox leans or tilts, even slightly, compared to how it originally stood
  • Cracks run through multiple bricks in a line, rather than staying isolated
  • Mortar crumbles easily when you press a finger into it
  • The base feels loose or shifts when you push against the post
  • Cracking keeps reappearing in the same spot after previous repairs

Any of these usually means the foundation or core structure has a problem that a surface patch won’t fix.

Why Leaning Is the Most Serious Warning Sign

A mailbox that leans is telling you something moved underneath it. This usually points to one of a few causes:

  • A weak or shallow foundation that never fully supported the weight
  • Soil erosion around the base from years of rain runoff
  • Frost heave pushing the ground unevenly, though this is less common in Birmingham than in colder climates
  • Root growth from a nearby tree disturbing the base

Patching the visible brick without addressing what’s happening below ground means the lean will likely return, and probably get worse.

What Causes Repeated Cracking in the Same Spot

If a crack keeps showing up in the same location after being patched, that’s rarely bad luck. It usually means there’s ongoing movement or stress at that exact point.

Common causes include:

  • A structural joint that was never properly reinforced during original construction
  • Water infiltration that keeps softening the same section
  • Vibration from nearby traffic or a driveway that shifts the ground slightly over time

A mason checking this kind of repeat damage will often look past the crack itself and investigate what’s causing the movement in the first place.

How Water Damage Shows Up Differently on a Mailbox

A brick mailbox takes on rain from every angle, since it usually sits fully exposed without any roof overhang for protection. This makes water damage progress faster than it might on a house wall.

Watch for:

  • Efflorescence, the white powdery residue that forms when water moves through brick and evaporates at the surface
  • Soft, crumbly mortar near the base, where water tends to pool longest
  • Discoloration that spreads wider each rainy season

Catching water damage early, before it reaches the base or foundation, keeps the repair simple instead of turning into a full rebuild.

When Full Rebuild Beats Another Patch

Sometimes the smartest move is stripping the mailbox down and rebuilding it properly, rather than patching around a problem that keeps coming back.

This usually makes sense when:

  • The base or foundation shows clear signs of failure
  • Multiple past patches have already failed in the same areas
  • The lean has progressed enough that the mailbox looks visibly crooked
  • More than a third of the brick face shows cracking or crumbling

A full rebuild costs more upfront but saves you from repeating a patch job every year or two on a structure that was never going to hold long term.

Questions to Ask Before Hiring Someone for Mailbox Repair

  • Is this damage isolated, or does it point to a foundation issue?
  • Will a patch actually hold, or is this heading toward repeat failure?
  • What caused the lean or cracking in the first place?
  • Should we rebuild the base, or is the current foundation solid enough to keep?
  • What’s the expected lifespan of a patch repair versus a full rebuild here?

Frequently Asked Questions

How much does brick mailbox repair cost compared to a full rebuild?

Minor repairs typically cost much less than rebuilding the entire mailbox. A full rebuild requires removing the existing structure, repairing or replacing the foundation if needed, and constructing a new mailbox from the ground up.

Can a leaning brick mailbox be repaired without rebuilding it?

Sometimes. If the lean is slight and the foundation remains stable, repairs may be enough. A mailbox with significant movement or a failing base often requires a complete rebuild for lasting stability.

Why do cracks keep coming back in the same area of a brick mailbox?

Recurring cracks often indicate an underlying issue such as foundation movement, moisture intrusion, or a structural weakness. Addressing the root cause is essential before making permanent repairs.

Does white residue on a brick mailbox mean there is a problem?

White residue, known as efflorescence, is a sign that moisture is moving through the masonry. While the residue itself is not harmful, ongoing moisture can gradually weaken mortar joints and brick if left untreated.

How long should a brick mailbox last before major repairs are needed?

A properly built brick mailbox can last for decades. Its lifespan depends on construction quality, weather exposure, moisture conditions, and protection from accidental impacts by vehicles or lawn equipment.

Brick Patio Layouts That Make Outdoor Spaces Shine

Brick patio layouts featuring a herringbone brick design with dining, fire pit, seating areas, and outdoor kitchen for a functional backyard.

A brick patio has to do more than look nice from the kitchen window. It has to hold up under foot traffic. It has to drain water the right way. It also has to guide people through the space in a way that feels natural. A good brick patio layout does all of that while still looking like the best spot in the yard.

Function Comes First in a Great Patio Layout

Plenty of patios get planned around one question: what will it look like once it’s done. That question matters, but it leaves out how the space actually gets used. A patio near a grill needs a different layout than one built for quiet morning coffee.

A strong layout starts with movement. Where do people walk from the door to the seating area? Where does a grill or fire pit need open space around it? Answering those questions before laying a single brick keeps the finished patio from feeling cramped once the furniture goes in.

Pattern Choices That Change How a Patio Feels

The pattern a patio is laid in changes how the whole space feels to walk through. It’s not just about how it looks from above. A running bond pattern lays bricks in simple offset rows. It creates a clean path that pulls the eye forward. It works well for a walkway or a long, narrow patio.

Herringbone patterns add more visual pop. The bricks angle in a zigzag that catches the light in different ways across the surface. That makes herringbone a strong pick for a patio meant to feel like a destination, not just a spot you pass through.

Basket weave patterns group bricks in small squares. This gives a patio a more structured, tiled look. This pattern works well for marking off one zone within a bigger space, like a dining area set apart from the rest of the yard.

Layouts That Handle Rain Without Trouble

Water has to go somewhere once it hits a patio. A good layout plans for that from the start. Brick patios need a slight slope built into the base. It usually angles away from the house, so rain runs off instead of pooling near the foundation.

Skipping this step causes real problems. A flat or poorly sloped patio can trap standing water after every storm. That trapped water softens the base under the brick over time. That softening leads to uneven settling. An uneven patio is both a trip hazard and an eyesore.

Good drainage planning also thinks about where water goes once it leaves the patio. Sending runoff toward a lawn, a drain, or a gravel bed instead of a neighbor’s yard keeps the whole layout working right for years.

Zoning a Backyard With Brick Borders and Transitions

A patio rarely serves just one job. It might need to handle dining, lounging, and a fire pit, all in the same footprint. Brick borders offer a simple way to mark these zones. There’s no need to build actual walls or fences between them.

A change in brick pattern, or a border of bricks laid in a different direction, can visually split a dining area from a lounge space. This works even when both sit on the same patio. This soft split helps a small backyard feel like it has several distinct areas instead of one flat slab.

Transition lines also help guide movement in a natural way. A slightly different brick look where a patio meets a lawn or garden bed shows where one space ends and another begins. This works without needing a physical step or barrier.

Small Finishing Touches That Elevate a Patio Layout

The small choices at the edges make a patio layout feel finished, not unplanned. A clean brick border along the edge keeps grass and mulch from creeping onto the patio. It also gives the whole layout a crisp, sharp look.

Mixing brick with another material, like gravel or wood decking, can add contrast without taking over the space. A brick patio bordered by a gravel path, or paired with a wood pergola, tends to feel more layered and thought out than brick used alone.

Lighting tucked along the edges or between pattern sections can stretch how a patio gets used well past sunset. Even a few small lights placed along a border or a step can turn a daytime patio into a space that works for evening gatherings too.

Furniture placement matters just as much as the brick itself. A layout with a bit more room near the main seating area gives chairs and tables space without crowding the edges. Cramped furniture can make even a well laid patio feel smaller than it really is.

Frequently Asked Questions

What is a brick patio?

A brick patio is an outdoor surface built from brick pavers or bricks set in a chosen pattern. It’s built to handle foot traffic, weather, and daily outdoor use while adding a tough, textured look to a backyard space.

Which brick pattern works best for a patio?

Running bond works well for high traffic areas and narrow spaces, since it creates a clear visual path. Herringbone suits spaces meant to stand out, and basket weave works well for marking off a specific zone within a larger patio.

Do brick patios need special drainage planning?

Yes. Brick patios need a slight slope built into the base so water drains away from the house instead of pooling on the surface. Skipping this step can lead to standing water and an uneven patio over time.

Can brick patios be combined with other materials?

Yes. Brick pairs well with materials like gravel, wood decking, and stone, which can add contrast and help mark off different zones within the same outdoor space.

How long does a brick patio typically last?

A well built brick patio can last decades with basic upkeep. Brick resists fading, cracking, and general wear better than many other paving materials when it’s installed the right way.

Brick Hearth Designs That Blend Style and Function

Brick hearth designs in a contemporary living room featuring a raised brick hearth, modern fireplace, and functional built-in seating.

A brick hearth does two jobs at once. It has to look good enough to anchor a room. It also has to hold up to real heat and daily use without cracking or fading. The best brick hearth designs never make you choose between the two.

A Hearth Has to Earn Its Place in the Room

A hearth sits at the center of a room, whether that room gets used every day or just on cold nights. Brick brings texture and warmth other materials can’t match. But it only works if the design fits how the space actually gets used.

A hearth that looks great in photos but scorches easily or collects soot in the wrong spots turns into a headache fast. Good brick hearth design starts with function first. The style choices get built on top of that solid base.

A well planned hearth also fits the room’s daily rhythm. Some hearths need to double as extra seating during a party. Others just need to look sharp behind a quiet fireplace on a cold night. Either way, the plan should start with how people will use the space.

Classic Brick Patterns That Never Go Out of Style

Classic brick patterns have stayed popular for a reason. Running bond, herringbone, and basket weave patterns each bring a different kind of texture to a hearth. Each one has proven itself over decades of use. These patterns mix visual interest with a surface that’s easy to clean.

A classic pattern also tends to age well. Trends in tile and stone can look dated within a decade. A well laid brick hearth with a traditional pattern still looks right years later. That staying power matters for a feature that isn’t cheap or easy to redo.

Hearths Built to Handle Real Heat and Daily Use

A hearth built for style but not for heat rarely lasts. Brick near an active fireplace has to handle real heat swings, day after day, without cracking or losing its color. That means picking the right brick type and the right mortar, not just what matches the room.

Fire-rated brick and heat-resistant mortar cost more up front. But they hold up where plain materials fail. A hearth that cracks after a few winters of use ends up costing more in repairs than picking the right materials would have cost at the start.

Daily use matters too, not just fire heat. A hearth gets walked past, leaned against, and sometimes used as extra seating. The brick and the joints between them need to handle that wear without chipping or wearing down at the edges.

Matching a New Hearth to a Home’s Existing Character

A new hearth rarely gets built on its own. It has to sit inside a home that already has its own look, whether that home is decades old or built last year. Hearth upgrades work best when they respect that existing look instead of fighting against it.

Older homes often call for a hearth that echoes the brick or stonework already in the house, like a matching color tone or a similar pattern. Newer homes have more room to try a fresh look. But even then, a hearth that feels totally cut off from the rest of the space rarely looks right.

This balance between old and new is part of what makes brick such a flexible material for a hearth. It can lean classic in an older home. It can also take on a cleaner, more modern shape in a newer build. Either way, it keeps the same tough core.

A hearth doesn’t have to match every detail of a home to feel right. It just has to speak the same visual language. A slightly warmer brick tone or a familiar pattern is often enough to tie a new hearth to a home built decades earlier.

Small Design Details That Make a Hearth Feel Custom

The details separate a good hearth from a forgettable one. A slightly raised hearth platform changes how a fireplace feels in a room. It gives the space more presence without needing a large footprint. A clean brick edge, cut and finished well, makes the whole feature look custom.

Small choices, like how the mortar joints get finished or how the brick wraps around a corner, add up fast. None of these details cost much extra on their own. But together, they turn a basic hearth into one that looks built just for the room it sits in.

Lighting plays a role too, even though it isn’t part of the brickwork itself. A small light aimed at the hearth can bring out the brick’s texture at night. It adds depth to a feature that might otherwise blend into the wall behind it.

Frequently Asked Questions

What is a brick hearth?

A brick hearth is the base and area around a fireplace, built from brick to handle heat safely while adding character to a room. It combines a fire-resistant surface with a design feature that anchors the space around it.

Can a brick hearth work with a modern fireplace?

Yes. Brick pairs well with both wood-burning and gas fireplace inserts, as long as the brick and mortar used can handle the heat output of the fireplace installed.

Do brick hearths need special maintenance?

Brick hearths need some cleaning to remove soot and ash, along with regular checks of the mortar joints for cracking. Well-built hearths with good materials usually need only light upkeep over the years.

How do I match a brick hearth to my home’s style?

Matching starts with looking at the brick tones and patterns already in the home, then picking a hearth style that either echoes those details or contrasts with them in a way that still feels planned rather than random.

Is brick hearth installation different from a regular brick wall?

Yes, in some ways. A hearth has to meet fire safety rules that a regular brick wall doesn’t, including proper clearance from anything flammable and the use of fire-rated brick and mortar near the firebox.

Stone Patio Design Features That Improve Outdoor Living

Natural stone patio with a fire pit, pergola, outdoor kitchen, and seating area designed to improve outdoor living behind a brick home.

A stone patio can change how you use your backyard. It adds space for grilling, sitting, and relaxing outside. In Birmingham, Alabama, homeowners want patios that handle hot summers, heavy rain, and red clay soil. The right design makes that happen. This guide walks through five things that matter most when planning a stone patio that lasts.

Choosing the Right Location for a Stone Patio

Location decides almost everything else about your patio. Pick the wrong spot and you’ll fight drainage, shade, and access problems for years.

Start by watching your yard for a few days. Notice where water pools after rain. Notice where the sun hits hardest in July. Birmingham summers run hot, so afternoon shade matters.

Things to check before you choose a spot:

  • Distance from the house (closer means easier utility and furniture access)
  • Slope of the land (gentle slopes drain better than flat ground)
  • Existing trees (roots can crack stone over time)
  • Privacy from neighbors
  • Sun exposure during peak use hours

A patio near the back door works well for daily use. A patio tucked further into the yard feels more like a retreat. Both can work. It depends on how you plan to use the space.

Designing a Stone Patio for Comfort and Function

A patio needs more than good looks. It needs room to move, sit, and gather without feeling cramped.

Size the Space for Real Use

Most small patios fail because they’re too tight for furniture and walking room. A table for four needs roughly 10 feet by 10 feet of open space. Add a grill or fire pit and you’ll want closer to 12 by 14 feet.

Plan Traffic Flow

Leave at least 3 feet of clear walking space around furniture. This keeps the patio from feeling like an obstacle course. Think about how people will move from the door to the seating area, and from the seating area to the yard.

Match the Shape to the Yard

Square and rectangular patios are simple to build and furnish. Curved patios soften a yard but cost more in labor since stone has to be cut to fit the edges.

Selecting Stone Materials That Complement Your Home

Stone choice affects cost, durability, and how well the patio matches your house.

Common options used in Birmingham area homes:

  • Flagstone – Irregular shapes, natural look, and a popular choice for homeowners considering flagstone patio installation for casual outdoor spaces.
  • Fieldstone – Rugged texture, works well with rustic or farmhouse homes
  • Travertine – Smooth surface, stays cooler underfoot in summer heat
  • Limestone – Light color, pairs well with brick exteriors common in the South

Match the stone tone to your siding or brick. A warm-toned stone next to red brick creates a connected look. A cool gray stone can clash with warm brick if you’re not careful.

Texture matters too. Smoother stones look more formal. Rougher stones fit casual backyard spaces better and hide dirt longer between cleanings.

Why Proper Drainage Improves Stone Patio Performance

Drainage is the part homeowners skip and regret later. Without it, water sits under the stone, freezes in winter, and pushes the patio out of level.

A patio should slope away from the house at about a quarter inch per foot. This small grade moves water off the surface instead of letting it pool.

Base Layer Matters

A compacted gravel base under the stone allows water to drain through instead of collecting underneath. Skipping this step is the top reason patios sink or shift within a few years.

Joint Material Affects Drainage Too

Sand-filled joints let some water pass through. Polymeric sand locks joints in place while still allowing drainage, which helps stop weeds and ants from moving in.

Alabama clay soil holds water longer than sandy soil. That makes proper grading and a solid gravel base even more important here than in drier regions.

Adding Features That Enhance Outdoor Living Spaces

Once the base patio is solid, added features turn it into a true outdoor room.

Popular additions include:

  • Built-in seating walls (saves space, doubles as a planter edge)
  • Outdoor kitchens (grills, counters, and storage built into the stone layout)
  • Fire features (a stone fire pit or fireplace extends use into cooler months)
  • Lighting (path lights or recessed step lights improve safety after dark)
  • Pergolas or shade structures (cuts direct sun during peak afternoon heat)

These additions don’t need to happen all at once. Many homeowners build the patio first, then add a fire pit or kitchen in a later phase. Planning the layout early makes it easier to add these features without redoing the whole patio.

Frequently Asked Questions

How long does a stone patio last?

A properly built stone patio with good drainage can last 25 years or more. Poor base preparation can significantly shorten its lifespan, often leading to major repairs within 5 to 10 years.

What is the best stone for a patio in Birmingham, Alabama?

Limestone and flagstone are both excellent choices for Alabama’s climate. They handle heat and humidity well, and their lighter colors help reflect sunlight instead of absorbing it.

Does a stone patio increase home value?

Yes. Outdoor living spaces, including stone patios, are often viewed as desirable features that can improve curb appeal and increase resale value, especially in areas where outdoor entertaining is common.

How thick should the gravel base be under a stone patio?

Most stone patios require a compacted gravel base that is 4 to 6 inches thick. Areas with heavy foot traffic or clay-rich soil may require a deeper base for long-term stability.

Can a stone patio be built on a slope?

Yes. A slight slope helps direct water away from the patio, but steeper slopes may require retaining walls or additional grading to prevent erosion and movement over time.

How a Stone Mason Creates Lasting Curb Appeal

A well-kept front yard tells a story before anyone reaches the door. One of the most reliable ways to improve that first impression is to hire a stone mason. A stone mason shapes and places natural or cut stone to build features that look sharp and hold up through years of weather. Whether the goal is a new walkway, a low garden wall, or a cleaner entry, stone delivers results that other materials rarely match. The National Association of Realtors reports that quality exterior masonry can return up to 80% of its cost at resale.

Start with the Right Stone

The best stone for any project depends on three things: the home’s architectural style, the local climate, and the available budget. A stone mason evaluates all three before recommending any material.

A modern home often suits smooth slate or clean-cut pavers. A cottage or traditional home usually calls for rough fieldstone or stacked limestone. Color matters just as much as shape. Stone should complement the siding, roof, and driveway rather than compete with them.

Some stones cut and shape more easily, which affects labor costs. Others are heavier and need a stronger base. Getting this decision right from the start prevents expensive corrections later. Natural stone installations last an average of 50 to 100 years when properly placed and maintained, far longer than timber or composite alternatives.

Add Features That Catch the Eye

Stone features don’t have to be large to make a real difference. A flat-stone walkway from the sidewalk to the front door changes how a home reads from the street immediately. A few low steps leading to the entry make the whole approach feel more deliberate.

Low stone walls along garden beds separate plants from lawn without looking harsh. A stone border around the base of the house, called a foundation surround, ties the whole exterior together. Even a single stone pillar at the end of a driveway adds structure and presence that’s hard to ignore.

These are not major construction projects, but they all need precise, experienced hands. A stone mason knows how to set each piece so it stays stable through rain, freeze-thaw cycles, and regular foot traffic.

Make Every Detail Look Neat

The difference between a decent stone job and a great one usually comes down to the small stuff. Straight lines, consistent joint spacing, and tight mortar work make everything look finished and intentional.

Uneven stones or wide, sloppy joints make a project look rushed regardless of how good the stone is. A skilled mason levels each piece carefully, checks spacing as they go, and fills gaps with mortar or compacted gravel correctly. They also cut stone cleanly at corners and edges so nothing looks jagged or improvised.

Good stone work doesn’t look added on. It looks like it was always there.

Match Stone with the Rest of the Yard

Stone works best as part of a complete outdoor design. Plants, driveways, fences, and lighting all shape how the space feels as a whole.

A gravel driveway with stone edging along the sides feels more finished and intentional. Plants near a stone wall soften the hard edges and bring in seasonal color. A wooden fence next to a stone pillar looks planned rather than accidental.

A mason who understands outdoor design helps connect each element to the next. The goal is one unified outdoor look, not a collection of separate projects placed near each other.

Protect the Look for Years

Stone is tough, but it benefits from routine attention. Dirt, moss, and algae build up over time and make even quality stone look dull. A rinse with a garden hose every few months handles most of it. For heavier buildup, mild soap and a stiff brush clean most stone surfaces without damage.

Check for loose stones once or twice a year, especially after winter. Freeze-thaw cycles shift stones and crack mortar over time. A loose piece caught early is a quick, inexpensive fix. Left alone, it turns into a larger and costlier repair. Crumbling mortar joints should be refilled before water gets underneath and causes structural damage below the surface.

Frequently Asked Questions

How do I choose the best stone for my project?

Consider the home’s style, the local climate, and the available budget. A stone mason can walk through the options and recommend materials that match the look you want while holding up to outdoor conditions year-round.

Can a stone feature be added to an older home?

Yes. Stone suits homes of all ages. It often works especially well with older homes because natural stone has a timeless, classic quality that complements traditional architecture.

What makes stone a good choice for outdoor projects?

Stone is dense, weather-resistant, and durable. It handles heat, cold, heavy foot traffic, and moisture better than wood, plastic, or composite materials. With basic care, it lasts 50 years or more.

How can I keep stone looking clean?

Rinse it with water every few months. For stains or moss, scrub with a soft brush and mild soap. Skip harsh chemical cleaners since they can strip the surface color or break down mortar over time.

When should damaged stone be repaired?

As soon as a problem appears. Loose stones and cracked mortar allow water in, which leads to structural damage underneath. A small repair done promptly costs far less than replacing a whole section later.

Does stone increase home resale value?

Yes. The National Association of Realtors consistently lists exterior stone features among the improvements with the strongest return on investment, particularly at the front of a home where buyer first impressions are formed.