Retaining Wall Drainage for Hillside Landscapes

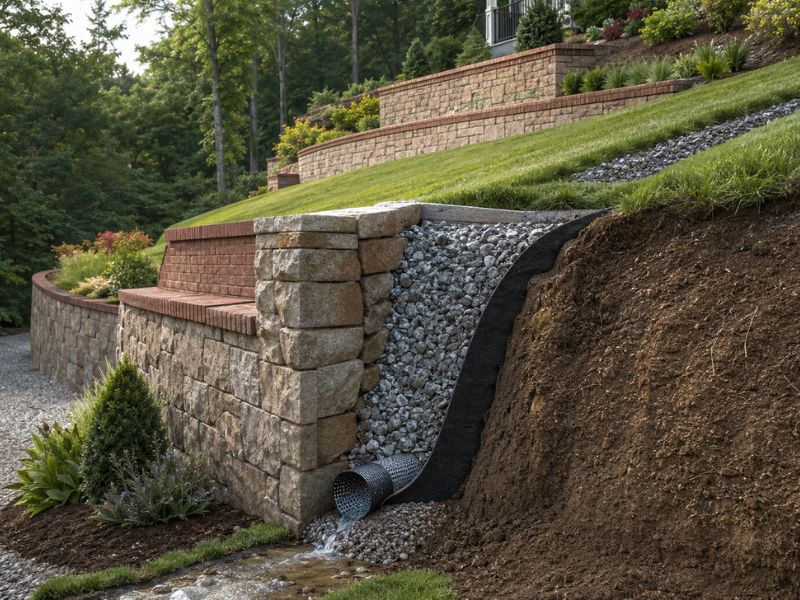
Cutaway view of retaining wall drainage on a hillside with crushed stone, filter fabric, and a perforated drainpipe directing water away.

A retaining wall holds back soil on a slope. But soil isn’t the only thing pushing against it. Water is too, and water causes most of the damage that shows up years later. A retaining wall without good drainage can bulge, crack, or lean over time. This can happen even when the wall itself was built well, using solid brick and stone retaining wall materials and a proper footing. The fix isn’t just a bigger wall or thicker blocks. It’s a full drainage plan. That plan keeps water moving away from the soil instead of trapped behind it. Here’s what that plan actually needs to include on a hillside property.

Stopping Runoff Before It Reaches the Wall

Rain moving downhill picks up speed and volume as it goes. By the time it reaches a retaining wall, it can carry a lot of force. Many people assume the wall’s own drain will handle all of this water. That’s asking too much of one small pipe.

Swales, berms, and simple grading changes can catch this runoff higher up the slope. A surface drain can do the same job in a spot where water tends to collect. These tools redirect water around the retained soil instead of through it. Handling water before it ever reaches the wall takes a lot of pressure off everything built behind it. A well-placed swale near the top of a slope can do more for a wall’s long-term health than any upgrade made to the wall itself.

Building a Layer That Lets Water Move

Even with good surface drainage, some water will still reach the wall. This is where the drainage zone behind the wall comes in. Builders place clean, crushed stone directly against the back of the wall, from the base almost to the top.

This stone layer gives water a fast, open path straight down. Instead of soaking sideways into the soil, it drains quickly toward the base. Without it, water builds up and turns the soil behind the wall into a heavy, saturated mass. That wet soil pushes hard against the wall face, whether the wall itself is made of brick and stone, poured concrete, or engineered blocks. Over months and years, that pressure is often what causes a wall to bow outward or crack.

Placing the Drainpipe in the Right Spot

Water that moves down through the stone layer needs somewhere to go. That’s the job of the toe drain. This is a perforated pipe set near the base of the wall. It has to sit low enough to catch water arriving at the bottom of that drainage zone.

Getting this placement right matters more on some sites than others. A steep slope raises the stakes. So does soil that drains poorly, a reinforced wall, or a taller wall. These conditions often call for a more detailed drainage plan than a standard toe drain alone. A brick and stone retaining wall that looks simple from the front can still need careful planning behind it. This becomes even more true once the slope above it gets steep enough to send a real volume of water toward the base.

Giving the Water Somewhere Safe to Go

A drainpipe only works if it actually leads somewhere useful. Water collected behind the wall needs to discharge into a lower area, a stormwater system, or another approved outlet. A pipe that just ends at the base of a slope can create a new problem instead of solving the old one.

The discharge point needs some protection too. Erosion can eat away at the outlet over time. Nearby landscaping work can accidentally bury or crush the pipe. Soil can shift and block the opening. Small animals sometimes build nests right at the outlet. That blocks the flow just as effectively as a pile of dirt would. Checking this spot occasionally keeps the whole drainage system working the way it was designed to.

Handling Water Between Stacked Walls

Hillside properties often use two or more brick and stone retaining walls stacked in tiers rather than one very tall wall. This spreads the load across several shorter structures. But it also means water from the upper level has to go somewhere before it reaches the lower wall.

Runoff from an upper terrace shouldn’t just flow straight down onto the wall below it. That water needs to be caught and redirected at each level. Left alone, it will saturate the narrow strip of soil between the tiers. That soil is already under pressure from both walls, so extra water there raises the risk for the whole system, not just one section.

Frequently Asked Questions

Does every hillside retaining wall need a drainpipe? 

Not every small wall uses the same setup, but brick and stone retaining walls on slopes, walls in poorly draining soil, reinforced walls, and many walls over four feet tall commonly need a toe drain or a full drainage plan.

Can surface grading replace drainage behind the wall? 

No. Surface grading redirects runoff before it reaches the retained soil. The drainage layer and pipe handle water that still gets through. Both systems work toward the same goal in different ways.

Where should retaining wall drainage water discharge? 

The outlet should lead to a safe lower area, an approved stormwater connection, or another spot built to receive the flow without causing erosion or new water problems nearby.

Why is filter fabric used in retaining wall drainage? 

Filter fabric keeps fine soil particles separate from the drainage stone. It also helps protect weep holes, lowering the chance that soil will work its way into the drainage path and clog it.

Should downspouts empty behind a hillside retaining wall? 

No. Roof runoff needs to be routed away from the retained soil instead of dumped behind the wall. Any concentrated water source like this should be identified and handled as part of the full site drainage plan.

Stone Pavers for Pedestrian-Friendly Courtyards

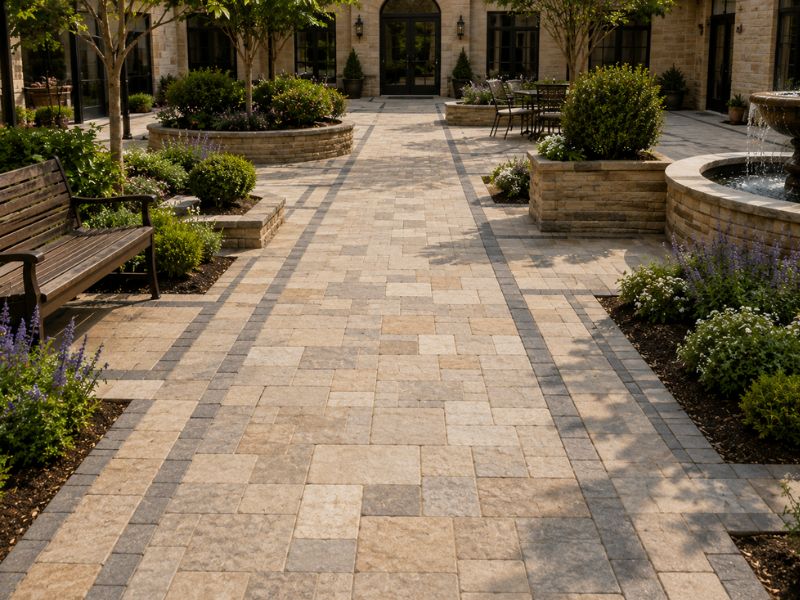
Stone pavers forming a wide pedestrian-friendly courtyard with smooth walkways, seating, landscaped planters, and a fountain.

Stone pavers do more than look nice in a courtyard. They shape how people actually move through space. A good layout guides feet naturally from one spot to the next. A poor layout creates awkward turns and tight squeezes. It also creates spots where people bump into each other. Get the paver design right, and a courtyard feels easy to walk through, even during busy hours. Get it wrong, and small problems pile up fast. Uneven joints are one example. Pavers that shift underfoot are another. Here’s what matters most when stone pavers need to carry steady foot traffic every day, in every kind of weather.

Building Clear Paths Between Every Entrance

A courtyard often connects several places at once. There’s the building door, the parking area, and maybe a garden. There are also shared spaces where people gather. Stone pavers can link all of these points with direct, simple paths.

The goal is a route that doesn’t force people to backtrack. It shouldn’t send them on a strange detour either. Sharp turns and dead ends cause slowdowns. They also create spots where people walking from different directions run into each other. A well-planned paver layout avoids this. It keeps paths straight where it can. It curves only when there’s a real reason to.

Think about a courtyard with three entrances feeding into one central space. If the paver layout treats each entrance as its own island, people end up crossing paths at odd angles near the middle. Laying out the route as one connected system instead solves that problem before it starts. Everyone gets a clear, direct line to where they’re going.

Setting Joint Widths for Steady Footing

Joints are the small gaps between each paver. They seem minor, but they matter a lot for safety. Wide, sunken, or uneven joints can catch a narrow heel. They can also snag a cane tip. A stroller wheel or a wheelchair caster can get stuck too.

Keeping joints consistent and closely spaced makes the whole surface feel smoother underfoot. This isn’t just about comfort. A joint that’s too wide in one busy spot can turn into a real tripping risk over time. This is especially true where people move quickly or carry something in their hands.

Making Smooth Transitions at Doors and Walkways

A stone-paved courtyard rarely exists on its own. It connects to door thresholds, sidewalks, and ramps. It also meets other paved areas nearby. These connection points need just as much attention as the courtyard itself.

A sudden height change at a doorway can trip someone up before they even notice the courtyard beyond it. The same goes for a raised edge where the pavers meet a sidewalk. An awkward little step tucked into a walkway causes the same problem. Smooth transitions keep the whole path feeling like one continuous surface. Nobody wants it to feel like a series of separate pieces stitched together.

Keeping Pavers From Shifting Under Daily Use

Pavers near a busy entrance or gathering spot take a beating. Constant foot traffic pushes and pulls at the joints over time. Without the right support underneath, pavers can start to spread apart. They can also shift out of place.

A stable setting bed and solid edge restraints hold everything together. Edge restraints work like a frame around the paved area. They keep the outer pavers from creeping outward as people walk across them day after day. This matters most at entrances and crossing points. Anywhere a lot of people gather at once will see the heaviest wear.

A weak edge restraint might not cause trouble right away. The real damage tends to show up months later, once joints have widened enough to loosen the pavers next to them. Checking the perimeter construction before installation is far easier than pulling up a section of finished courtyard to fix a problem that started underground.

Placing Seating and Features Off the Main Path

Benches, planters, fountains, and bike racks add character to a courtyard. But if they sit too close to the main walking route, they can turn a wide, easy path into a tight squeeze.

Keeping these features clear of primary walking zones matters more during busy times. That’s when several people might be moving through the courtyard at once. It also matters for anyone using a wheelchair, walker, or stroller. A narrow gap that works fine for one person on foot might not work at all for someone who needs more room to pass. Planning enough clearance around these features keeps the courtyard comfortable, no matter how many people are using it.

Frequently Asked Questions

Are stone pavers suitable for heavily used courtyards? 

Yes. Properly installed stone pavers can handle frequent foot traffic well. The base, joints, edges, and transitions all need to stay stable and even over time.

How wide should a pedestrian route through a courtyard be? 

The right width depends on the property and any accessibility rules that apply. The route needs enough clear space for people, wheelchairs, strollers, and mobility aids to pass through safely.

Can uneven courtyard pavers be repaired individually? 

Often, yes. A few pavers can usually be lifted and reset if the settlement is limited to a small area. Widespread shifting across a larger section may point to a deeper issue with the base or the edge restraints.

Why do courtyard pavers begin separating? 

Separation usually comes from weak edge restraints or movement in the base. Lost joint material and steady pressure along a busy route can cause it too. Fixing the actual cause helps stop the problem from coming back.

Should stone pavers be level with adjoining sidewalks? 

The two surfaces should meet through a smooth, well-planned transition. A sudden lip or a change in height can create a tripping hazard. It also makes the courtyard harder to move through.

Stone Patio Design Features That Improve Outdoor Living

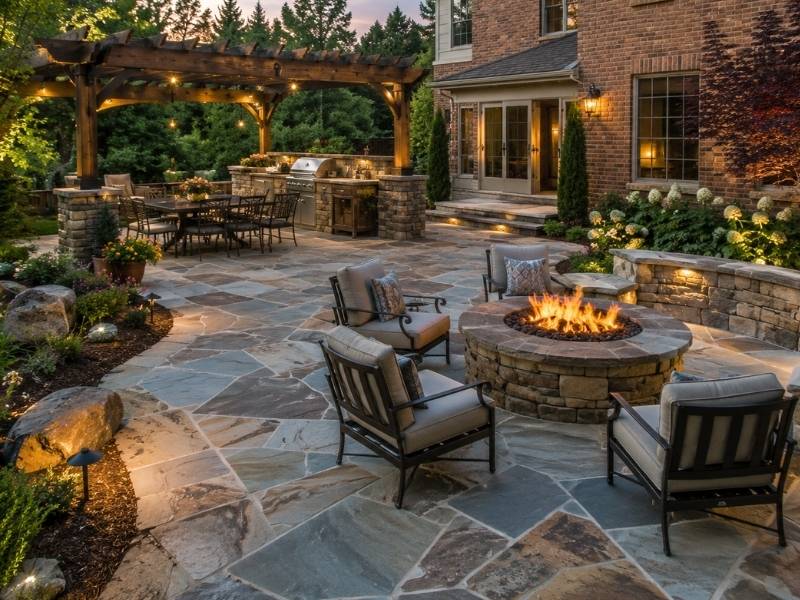
Natural stone patio with a fire pit, pergola, outdoor kitchen, and seating area designed to improve outdoor living behind a brick home.

A stone patio can change how you use your backyard. It adds space for grilling, sitting, and relaxing outside. In Birmingham, Alabama, homeowners want patios that handle hot summers, heavy rain, and red clay soil. The right design makes that happen. This guide walks through five things that matter most when planning a stone patio that lasts.

Choosing the Right Location for a Stone Patio

Location decides almost everything else about your patio. Pick the wrong spot and you’ll fight drainage, shade, and access problems for years.

Start by watching your yard for a few days. Notice where water pools after rain. Notice where the sun hits hardest in July. Birmingham summers run hot, so afternoon shade matters.

Things to check before you choose a spot:

  • Distance from the house (closer means easier utility and furniture access)
  • Slope of the land (gentle slopes drain better than flat ground)
  • Existing trees (roots can crack stone over time)
  • Privacy from neighbors
  • Sun exposure during peak use hours

A patio near the back door works well for daily use. A patio tucked further into the yard feels more like a retreat. Both can work. It depends on how you plan to use the space.

Designing a Stone Patio for Comfort and Function

A patio needs more than good looks. It needs room to move, sit, and gather without feeling cramped.

Size the Space for Real Use

Most small patios fail because they’re too tight for furniture and walking room. A table for four needs roughly 10 feet by 10 feet of open space. Add a grill or fire pit and you’ll want closer to 12 by 14 feet.

Plan Traffic Flow

Leave at least 3 feet of clear walking space around furniture. This keeps the patio from feeling like an obstacle course. Think about how people will move from the door to the seating area, and from the seating area to the yard.

Match the Shape to the Yard

Square and rectangular patios are simple to build and furnish. Curved patios soften a yard but cost more in labor since stone has to be cut to fit the edges.

Selecting Stone Materials That Complement Your Home

Stone choice affects cost, durability, and how well the patio matches your house.

Common options used in Birmingham area homes:

  • Flagstone – Irregular shapes, natural look, and a popular choice for homeowners considering flagstone patio installation for casual outdoor spaces.
  • Fieldstone – Rugged texture, works well with rustic or farmhouse homes
  • Travertine – Smooth surface, stays cooler underfoot in summer heat
  • Limestone – Light color, pairs well with brick exteriors common in the South

Match the stone tone to your siding or brick. A warm-toned stone next to red brick creates a connected look. A cool gray stone can clash with warm brick if you’re not careful.

Texture matters too. Smoother stones look more formal. Rougher stones fit casual backyard spaces better and hide dirt longer between cleanings.

Why Proper Drainage Improves Stone Patio Performance

Drainage is the part homeowners skip and regret later. Without it, water sits under the stone, freezes in winter, and pushes the patio out of level.

A patio should slope away from the house at about a quarter inch per foot. This small grade moves water off the surface instead of letting it pool.

Base Layer Matters

A compacted gravel base under the stone allows water to drain through instead of collecting underneath. Skipping this step is the top reason patios sink or shift within a few years.

Joint Material Affects Drainage Too

Sand-filled joints let some water pass through. Polymeric sand locks joints in place while still allowing drainage, which helps stop weeds and ants from moving in.

Alabama clay soil holds water longer than sandy soil. That makes proper grading and a solid gravel base even more important here than in drier regions.

Adding Features That Enhance Outdoor Living Spaces

Once the base patio is solid, added features turn it into a true outdoor room.

Popular additions include:

  • Built-in seating walls (saves space, doubles as a planter edge)
  • Outdoor kitchens (grills, counters, and storage built into the stone layout)
  • Fire features (a stone fire pit or fireplace extends use into cooler months)
  • Lighting (path lights or recessed step lights improve safety after dark)
  • Pergolas or shade structures (cuts direct sun during peak afternoon heat)

These additions don’t need to happen all at once. Many homeowners build the patio first, then add a fire pit or kitchen in a later phase. Planning the layout early makes it easier to add these features without redoing the whole patio.

Frequently Asked Questions

How long does a stone patio last?

A properly built stone patio with good drainage can last 25 years or more. Poor base preparation can significantly shorten its lifespan, often leading to major repairs within 5 to 10 years.

What is the best stone for a patio in Birmingham, Alabama?

Limestone and flagstone are both excellent choices for Alabama’s climate. They handle heat and humidity well, and their lighter colors help reflect sunlight instead of absorbing it.

Does a stone patio increase home value?

Yes. Outdoor living spaces, including stone patios, are often viewed as desirable features that can improve curb appeal and increase resale value, especially in areas where outdoor entertaining is common.

How thick should the gravel base be under a stone patio?

Most stone patios require a compacted gravel base that is 4 to 6 inches thick. Areas with heavy foot traffic or clay-rich soil may require a deeper base for long-term stability.

Can a stone patio be built on a slope?

Yes. A slight slope helps direct water away from the patio, but steeper slopes may require retaining walls or additional grading to prevent erosion and movement over time.